Showing posts with label crafts. Show all posts

Tuesday, March 19, 2013

Pink hair - success!

Well, it worked! Not without a couple of scares though. First, my husband looked at me like I was crazy when I said I was going to sleep with the dye in. He said, isn't that going to damage your hair? I said, who knows? It's only the ends, right? He said, it's like half your hair. Look on the internet to see what they say.

So I looked on the internet, and everyone was like HALF AN HOUR AT MOST OR YOUR HAIR WILL DISINTEGRATE LIKE THE BAD GUY IN INDIANA JONES AND THE LAST CRUSADE! All right, they didn't actually use the Indy reference, and thus their advice was not worthy of being listened to. So instead I took it out of the plastic bag and tugged on the ends, and they were kind of crispy but it was a "you have sugary cooldrink in your hair" kind of crispy and not a "your hair is turning into powder" kind of crispy. So I put the plastic bag back on and went to sleep.

The second scare was when I was sleeping, I dreamed I woke up and washed my hair and all the dye came out and it was no different from before, and I was all AAARGH THAT SUCKS and then I woke up again and realised it had just been a dream, so then I went and washed it out for real this time, and conditioned it, and dried it in the sun, and now it looks like this:


I am exceedingly happy with the way it's turned out. My husband likes it, my mother is amused/shocked, my father amused/indifferent, and I've got one non-family compliment so far. Can't wait to see what people think at the gallery, since I am in possibly the only field where pink hair will enhance my professional image.

Action shot (I can't model):


Oh, by the way, what do you guys (anyone out there!) think of the etiquette of posting photos? Narcissistic to show my face? Creepy not to? Are outfit posts irredeemably shallow, as I've been thinking of starting to do them occasionally?  Help me out here, please!

Sunday, March 17, 2013

Pink hair! In which I destroy my hair in several ways so you don't have to.

I've been thinking about this for a long, long time, and today is the day that I'm finally going to try it. I want to dye the ends of my hair pink. And I'm going to do it myself, using only random household materials like hydrogen peroxide, food colouring, powder cooldrink and, um, swimming pool chlorine.

Please note that I have really long and healthy hair, because I never do anything to it. I'm going to be dyeing the ends only, so if anything goes horribly wrong then I can just cut them off. I wouldn't be messing around with unknown chemical processes if they were going to go anywhere near my actual scalp, or if I couldn't afford to lose a bit of length if I decide that I hate it and the only remedy is to cut my losses and run.

Why do I want to dye my hair pink? Well, I have really long hair (did I tell you that yet?) And I want to do something really dramatic to it. But cutting it all off is just out. Like, I really don't like those makeover TV shows, and I really don't like the fact that whenever they come across some poor unfortunate soul with long hair, they immediately leap on her and chop it all off, usually making it sound as if long hair is some kind of dreadful psychological issue that she needs to overcome.

And don't get me started on the freaky compulsion to straighten people's hair, they seriously act like curls are some sort of mark of Cain. I've literally seen someone write that you have to have straight hair to look "professional". Professional? Seriously? I smell a rat, and it smells like racism. I mean, have you noticed that with any female character in a TV series - if she makes it to the second season, her hair always mysteriously goes dead straight.

...Ahem. Pardon the digression. I just have a lot of feelings about that issue. Getting back to the matter at hand, why pink? I actually think that a sort of blue-green or turquoise will be a better long-term colour for me, but I'm doing this to punctuate my life and tell myself that things are looking up! and pink feels to me like the ultimate feel-good, statement-making, optimistic, exclamation-markish colour. Besides, Art Student Owl says Must Have Pink Hair.

Here are my materials:


Honestly, I wasn't planning to use the chlorine after every search I did for it came up with a lot of people screaming DON'T YOU DARE! The aim was to lighten the hair first with peroxide, and then to dye it with a mixture of more peroxide and food colouring. But after I doused my ends in peroxide and it dried off after half an hour and did precisely nothing, I decided to break out the big guns. As it seemed that the peroxide didn't work so well because my hair is too healthy (#firstworldproblems #humblebrag) I figured that the chlorine might at least damage it enough to absorb the peroxide later. I used about a tablespoon of chlorine in a glass bowl of water (between a half and one litre, I suppose) and didn't put my hands in it, just dipped the ends of my hair. I did it outdoors and made sure the bowl was downwind from my face. I did this twice, and still I don't think the colour is much changed. I dumped the rest of the mixture in the pool after I was done (recycling, guys!) Again, note that all this is going on about 80 centimetres from my scalp. And here's the result:


It doesn't look particularly different from before, but I asked two people and they say it's definitely lighter. Now I could keep on bleaching it and drying it over and over, but that would require patience.

So instead I decide to move right on to the colouring stage. Now, apparently if you are right and virtuous on the internet you only use products designed and marketed at great cost for your specific purpose, and the product that everyone recommends for this purpose is something called Manic Panic. However, if I just started ordering and importing everything I wanted, I would be living in a nest of art materials while not eating anything. Which would not be good. So instead I decided to go the kludge route, and found that this tutorial was very helpful.

I'd also heard that Kool-Aid is supposed to be better than food colouring. Unfortunately, Kool-Aid, like Manic Panic, is not available where I live. So I went and bought a random packet of powder cooldrink called Amila in the hope that it would be similarly virulently coloured. I got the "mixed berries" flavour 'cause I figured it would be sort of purplish.

I mixed some of the Amila powder with two brands of "Rose Pink" food colouring (liquid and gel) and some of the peroxide (That's what "developer" is, when talking about hair colouring) in the glass bowl and squished the ends of my hair about in it. Then I worked the sticky, sugary, peroxidey, red mixture up a bit into the rest of my hair, hoping that it would create a sort of ombre effect. I looked like an advert for Dexter.


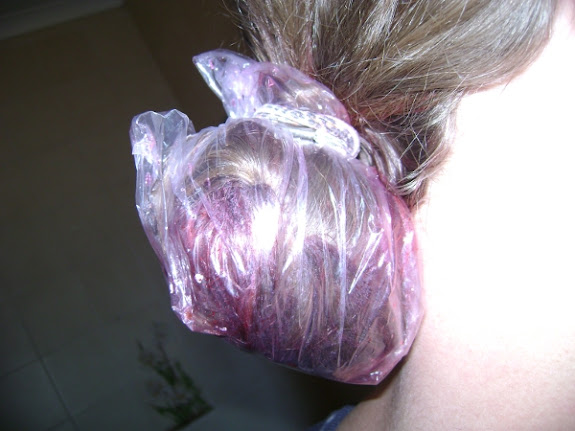
After that I tied my hair in a knot, put a plastic bag over it and secured the whole thing with a hair elastic.


And I'm planning to keep it on like that as long as my patience holds out. My hands are currently bright pink and the sensitive bits under the nails hurt from the peroxide, so definitely use gloves if you do the same thing. And tomorrow we'll see how it turns out!


Friday, December 28, 2012

Butterfly on porcelain


Last month the local BAASA group had a porcelain painting workshop. I painted this butterfly on a random milk jug and am now totally hooked, I just want to paint on every bit of china I see, but don't actually own the necessary supplies myself. BAASA!?

Anyway, it's really great because you paint on already-fired porcelain or bone china, which means whatever you have around the house or find at the shops is fair game. The paints are overglaze powders that you have to mix with esoteric oils and things, and fortunately most of the time what you see is what you get in terms of colour. You need to fire the painted pieces in a kiln, sometimes several times between layers especially if you are trying to get a nice bright red, but when you're done the design is permanent: you can wash it, eat off it, whatever. I'm hoping that a couple of us will get together in the future and share materials so that I can do more. I started a sugar bowl to go with the milk jug, but someone sadly cleaned off my drawing (in a special porcelain pencil that disappears when fired; normal pencil will become part of the glaze and be permanent) so I have to start over again.

I never used to be able to draw butterflies, because I couldn't get them even close to symmetrical. Then one day I realised that you could draw half a butterfly and trace it in reverse for the other side. Even later (like, last month) I realised that you can use a simple four-square grid to guide you in situations where tracing doesn't work so well.

I drew a few for you to demonstrate - figured that horrible mouse-drawing would replicate the effect of trying to use a disappearing pencil on a wobbly moving object with a curved surface.

The aim here is to show that you don't need to draw beautifully to get the right effect - the grid will allow you to achieve the basic symmetry that will make your butterfly look right. The first one is a bit wrong: in general the thorax needs to be in the "crosshairs" because both pairs of wings (and all the legs) grow out of it. I haven't drawn in their heads. You need to make the head small and inconspicuous to look right; our instinct as humans (duh) is to place special emphasis on the head and eyes, making them a lot bigger than they should be. This makes the butterfly look cartoonish rather than real.

Butterflies, butterflies, I am going to go and draw lots of butterflies now!


Wednesday, February 29, 2012

Tiny, delicate, gold.

Hmm, I think I need to start with an explanation about how I read other people's blogs. I love reading blogs, read them constantly, but I don't - can't - do the Google reader, feed, catch up with "my" blogs every day kind of thing. Too much clicking, too few words. Reading is like oxygen, I need large amounts. Instead I like to read them all in one go. I'll find one that catches my eye, and follow it back and back until I lose interest or run out of posts. Then I'll start reading a new one, and try to forget about the old one for long enough for a good number of posts to build up before I check on it again.

That's how I came across this post, from October last year, by a super cool Australian called Hannah-Rose Yee. (What is it with these Australians and fashion, all the Country Road clothes in Woollies are calling my name. I hear them at night.... Wait, what was I talking about?)

Anyway, although the phrases "Olsen twin" and "fashion icon" do not belong in adjacent areas of my brain, Hannah-Rose's genius is such that as I read the post I found myself remembering certain things - like how much fun it was aged 12 or so to run around with my best friend in matching anklets, also, that I have a pair of jeans that exact length hiding in my wardrobe that haven't had nearly enough wear lately, and lastly, that in my jewellery box lurk at least three thin gold chains dating back to the time when thin gold chains were the thing to give to a little girl of a certain age, only I never wore them because I was running around in purple leather anklets instead. That, in other words, a pair of delicate gold anklets had become suddenly, inexplicably, desirable - and, unlike those Country Road clothes, well within my reach.


It seriously took me less than half an hour to turn one of my old chains into these. Most of that time was spent picking out the beads - I wanted them to be similar but not identical, and a sort of gold-ish neutral so that the whole thing would be a bit understated. By the time they were done I was having way too much fun to stop there, so naturally my next thought was "so how will they look if I wear them as a necklace?"


The answer was "pretty good, although the second clasp in the front looks just a little superfluous." Superfluous, huh? My inner voice thinks it's all educated and stuff today. So I made it non-redundant - take that, inner voice! - by adding a brass star charm (stolen from my charm bracelet) on an extra bit of chain (hey, I'd already cannibalised the findings from the second chain, it wasn't about to miss a few more links).


Then I realised that the extra length of chain would be just enough to let me wear it as a bracelet as well. It took me a while to figure out how to loop it through, but it worked. So here I am, feeling all smug and thrifty, with the ultimate Transformer piece of jewellery (It's a bracelet! Now it's a necklace! Now it's two anklets! I feel like I should be selling it on some over-excitable home-shopping show). I'll probably end up wearing it as a necklace most of the time, as I'm a necklace person through and through.

I found it the tiniest bit intimidating to try and hack fine jewellery like this - that pesky inner voice was all like "I can't do this, it's proper jewellery", but it's actually the easiest thing in the world to do. You just have to note that although the links in these fine chains can't be opened and closed, all the slightly larger ones used to attach the findings (clasps and so on) can be. So you have to cut the small links, maybe you lose one or two; but for the rest it's just opening and closing jump rings like anything you can buy in the craft shop.

So, what's hiding in your jewellery box?


Friday, December 9, 2011

Out of the attic: 17 cats


I made this design last year to go on a mug as a gift for my aunt. I'd like to have more mugs made some day. Of course that would mean I'd have to find a printing place. And, you know, go in, and talk to them...

In the meantime, I've enlarged a couple of them just for you. There's slinky cat:


Then there's smug cat:


And then my own little Katala.


Note the tail. It was like that when we got her, promise! Actually, the end is there - it just never grew. I suspect it was bitten when she was very small by one of her littermates or, more probably, her mother.


Wednesday, June 29, 2011

Post-apocalyptic

So, I had this cardigan coat thing. I bought it about two years ago because I loved the buttons. Sadly, after hardly wearing it that winter, I realised that much as I loved the buttons, they made it look a little bit like a clown coat. Also, it wasn't that great for wearing open as it didn't have buttonholes, actually closing with giant press-studs that showed when not fastened. And if you can't wear a coat open around here, it's not likely you'll be wearing it very much. Plus, it was just a touch too big for me and the sleeves hung down over my hands. So I decided I'd have to do something to make it more interesting.


Here it is with the brand censored out (I'm sure they wouldn't like the clown comment). When I took this picture I had already removed the buttons and studs - I just balanced them in place here to show you what it used to look like. It sat in my pile of stuff-to-be-mended for a whole year, while I imagined learning to crochet and making sweet flowery edgings... but then I changed my mind.

You see, I'll buy with glee and wear to pieces anything that looks like it comes from one of my favourite movies, and a lot of my favourite movies tend to involve fighting, running, aliens, zombies, fighting aliens, running from zombies, vice-versa, etcetera. Which means that I'm guaranteed to fall for anything that's full of buckles and belts and pockets, and looks as if it were cobbled together some time after the apocalypse from an old pair of cargo pants and anything else that was unwise enough to wander past at the time.


So that's exactly what I did. The day after what some people thought would be the end of the world, I chopped up a pair of cargoes that had finally given up being pants (I haven't shown you the pants as they were because I know you'd know I was still actually wearing them right up to that point) and cut out the pockets, the waistband, and all the double seams with a bit of fabric on each side. Then I hemmed all the bits on a sewing machine and stitched them onto the cardigan by hand. I had to be careful, especially with the turned-up sleeves and the waistband, to bunch the knitted fabric together as I sewed. Otherwise the wool wanted to stretch out and go all curly at the edges. You can see it's still a little like that at the cuffs. So after much sewing and diligence....


Yay! I've been wearing the heck out of it since then. My mother thinks I'm odd. And the buttons? I'll just have to think of something to do with them...


Wednesday, September 29, 2010

The Art Cake's Tale, or how Cake Wrecks saved my life (well, at least my reputation)

(CONTINUED FROM AUGUST 1)
"Hey, Lesley," said the owner of the lovely local gallery, "do you bake?"

"Bake!" I thought, "... ."

I do indeed bake. I like baking. I bake really tasty things. However, when it's the owner of an art gallery asking, it's not generally the taste that's going to matter.

"Um.... yes! I bake!" said I in the perky, enthusiastic tone I try to use whenever business looks like coming my way. "Good," he said, or something to that effect, "because one of the people who was going to bake an art cake for the self-portrait exhibition has pulled out, so can you make one for the opening next Saturday?"

A number of questions entered my mind at that point. The first and most important was, what is an art cake?

"What is an art cake?" I asked. I received no definitive answer. Apparently an art cake is a cake made by an artist, and an artist makes any kind of cake she wants to make. And calls it an art cake. The art cakes were to be sold along with the self-portraits, and any left over would be eaten by the ravening hordes that would be thronging the gallery for the opening.

"Of course!" I said, perkily. "That sounds like fun - I'll bring it along on Saturday." It was a deal, and now I had to make an art cake.

It did indeed sound like fun. I had a week to decide what I was going to do, teach myself how to do it, and produce a cake that would impress All Who Saw It. My entire future (all right, the next few weeks, maybe) would depend on this cake. I hit the Internet.

I spent days and days reading up on what the collective wisdom of the human race has to say about cake decorating. I saw lovely blogs about cupcakes, recipe collections, professional cake decorators' sites. But the one blog that I kept coming back to, the one whose entire content I read in one giant archive binge, the one that taught me the most about what to do, and even more about what never, ever, ever to do... was Cake Wrecks.

Go there. Read it. Laugh. Cry.

Then come back here. Everything I needed to know about icing (frosting, if you live in America), I learned from Cake Wrecks. So Jen (and John, and the other Jen, and whoever else is responsible for this marvel of educational hilarity), I dedicate my Art Cake to you. These are the things I learned:

1) I will never understand the mania for those horrible, inedible-looking sheet cakes. I don't think they're so big over here - at least I've never had the misfortune to come across one. Where I live, if you want to take a cake to the office for someone's birthday, you buy it from the tuisnywerheid. Literally meaning home industry, this word refers to the glorious business model of hiring people to bake cakes, koeksisters and other delicious goods at home and selling them in a little deli-type shop. These cakes are iced, if at all, with regard to taste rather than appearance and tend to involve things like chocolate icing with caramel, or vanilla icing with granadilla (passion fruit) curd. Yum, yum. So. No sheet cakes.

2) I also decided early on that I would not be attempting a tiered cake. They can be gorgeous, but on the other hand this can happen, particularly in a warm climate and particularly when the cake has been constructed by a newbie like me. So I made a basic, round cake. I crumb coated it with lemon curd, just because I like lemon, and I did this to it:


I like polka dots on cakes.


3)

If you're going to have brown icing on your cake, for all our sakes make sure it isn't lumpy! The baby blue polka dots help too, I think.

4)

Pink and orange together make Jen happy. Sorry, Jen, that I didn't get a better angle of that bit! I'm not sure why it got left out.

5) As for the icing - it's fondant, Jen, but not as you know it. What you call fondant, we call "plastic icing" and appropriately so. Instead I used a combination of two recipes in my mom's old cake decorating books, coming up with something that is almost pure sugar with just a touch of bicarb and gum tragacanth to give it shape. It's really good and tastes nothing like polymerised organic molecules. I tend to eat it as candy.

It took me about two days solid to make the cake and the icing and put it all together. Then I took it to the opening. They liked it! It sold, twice over! Which is more than twice as much as I can say for my self-portrait...

So thank you, Jen and the other Cake Wrecks people. I know you know that your site provides much-needed levity for the depressed and downtrodden, but now you know it's educational as well. Oh, and guys? Go check out Jen's other site as well. I'm starting to feel the urge to steampunk-ify things...